Over the last week I've had to write a lot of code to handle audio input and output as I've been building an AI voice agent that runs on my Raspberry Pi. In order to make my voice agent work, I had to learn how computers process sound.
If you know me, then you know that I'm not satisifed with just learning enough to make the feature work. I need to learn it at the most granular level to satisfy my curiousity.
So what follows is a pretty detailed explanation of how your computer takes digital bytes and outputs sound.
I found it fascinating and you might too.
Digital Sound
Every digital audio file (whether it's a high-resolution WAV or compressed MP3), is fundamentally just a long sequence of bytes. The raw array of bytes that we work with typically represent a Pulse-Code Modulated (PCM) signal. PCM is is how we represent analog audio in a digital format. For example, I recorded a two-second clip of myself saying my name and this is what the file dump looks like:
orangepi@orangepizero3:~/sage$ hexdump -C evis.wav | head -50
00000000  52 49 46 46 24 fa 00 00  57 41 56 45 66 6d 74 20  |RIFF$...WAVEfmt |
00000010  10 00 00 00 01 00 01 00  80 3e 00 00 00 7d 00 00  |.........>...}..|
00000020  02 00 10 00 64 61 74 61  00 fa 00 00 ee d1 e3 cc  |....data........|
00000030  66 cf 03 cf f4 c7 42 c7  52 c5 d2 bd e4 bf f9 c2  |f.....B.R.......|
00000040  f6 c9 08 d4 3c d4 f7 d7  94 d8 a6 d1 be cd 54 cc  |....<.........T.|
00000050  cd cc ec cd 61 d0 c7 d3  df d4 81 da 31 e1 a4 df  |....a.......1...|
00000060  bb e0 98 e2 99 e1 bd e2  d8 e4 18 ea 95 ec cb ea  |................|
00000070  ad eb 2f ef f2 f1 92 f0  de ee 9a ef b8 ef 6c f4  |../...........l.|
00000080  00 f9 12 f7 72 fa fe fe  e3 fd 08 02 87 04 86 04  |....r...........|
00000090  03 06 1c ff d6 fb 21 ff  d0 01 7a 04 93 07 fc 0c  |......!...z.....|
000000a0  9f 0e 8c 0f 49 11 c8 11  7e 17 77 1b fc 18 68 17  |....I...~.w...h.|
000000b0  8b 15 5d 17 c6 1c 09 1f  78 23 07 27 a8 25 25 24  |..].....x#.'.%%$|
000000c0  a3 24 f7 26 55 29 87 2b  d3 30 92 34 5a 34 48 37  |.$.&U).+.0.4Z4H7|
000000d0  dc 38 f1 36 61 38 d2 39  94 38 58 37 4e 37 e7 38  |.8.6a8.9.8X7N7.8|
000000e0  50 39 75 37 c4 35 f7 34  1d 35 c5 36 bb 39 10 3c  |P9u7.5.4.5.6.9.<|
000000f0  65 3b 0b 39 f6 34 ec 2c  5a 28 03 27 63 23 30 22  |e;.9.4.,Z(.'c#0"|
00000100  fa 21 6d 22 91 23 37 21  d1 1f 42 1f 32 1b 86 17  |.!m".#7!..B.2...|
00000110  15 14 2f 10 16 0d c4 09  cc 07 2d 06 e2 04 65 04  |../.......-...e.|
00000120  57 02 8f 00 92 00 ac ff  c3 fd f2 fa 39 fa 64 f9  |W...........9.d.|
00000130  e1 f4 65 f4 4d f5 d3 f3  a6 f2 69 ef cd eb b7 e9  |..e.M.....i.....|
The first part (RIFF, WAVEfmt) is the WAV file header, which describes format, sample rate, bit depth, etc. (we'll touch on these in a second).
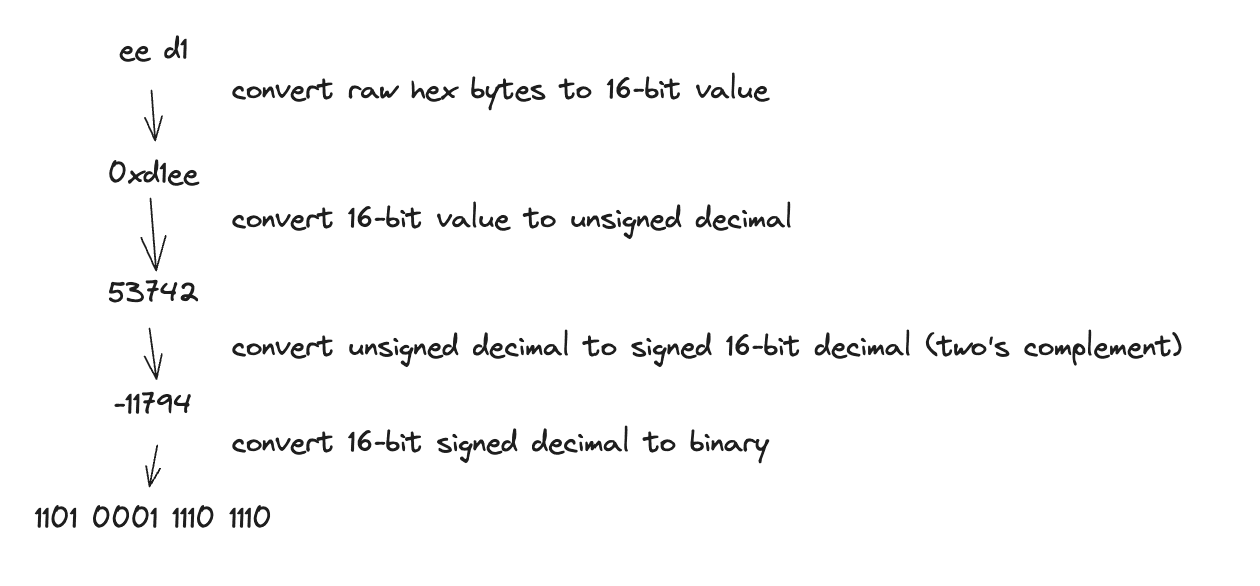
After the "data" chunk marker on the third line, the values (ee d1 e3 cc 66 cf ...) are the actual PCM audio samples. Each sample is a 16-bit signed integer (this is configurable, I set the formatting to -f S16_LE), so we use two hex bytes (1 byte = 8 bits; 16-bits = 2 bytes) to represent the first sample which is ee d1.
The translation waterfall looks like this:
To make sense of these bytes, we need to understand three key parameters.
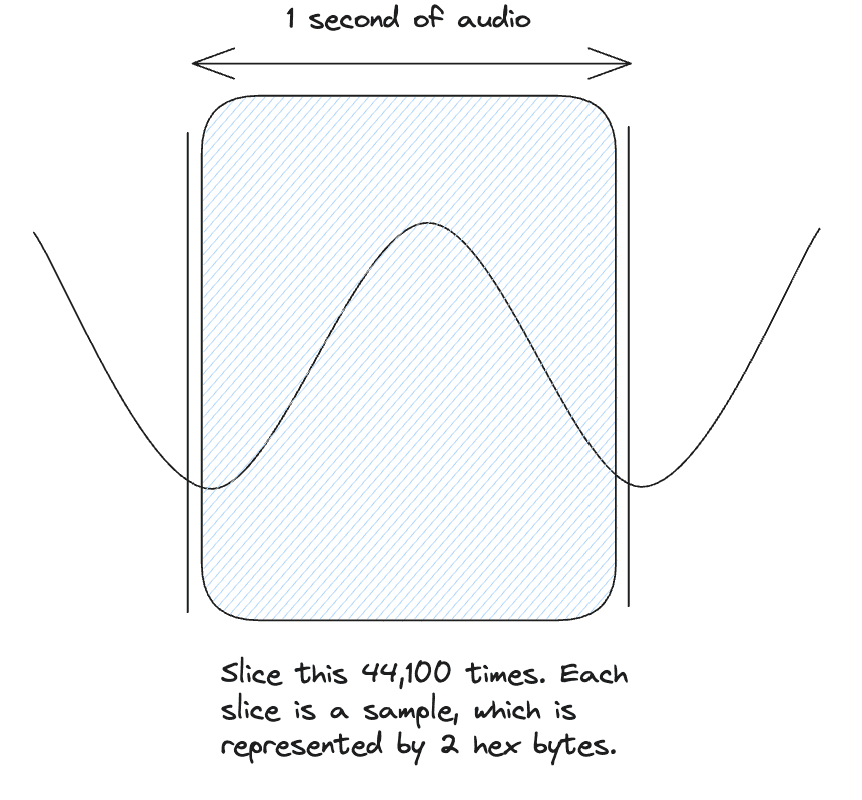
- Sample Rate (): Defines how many numerical "snapshots" (samples) of the audio waveform are taken per second, measured in Hertz (Hz). For pretty good audio, the sample rate is 44,100 Hz. Meaning that we take 44,100 samples of the audio per second. The choice of sample rate is dictated by the Nyquist-Shannon sampling theorem, which states that the sampling frequency must be at least twice the maximum frequency () you wish to represent (). Since the upper limit of human hearing is around 20 kHz (20 kHz = 20,000 Hz), a rate of 44.1 kHz gives us a comfortable margin and prevents a bunch of nasty effects.
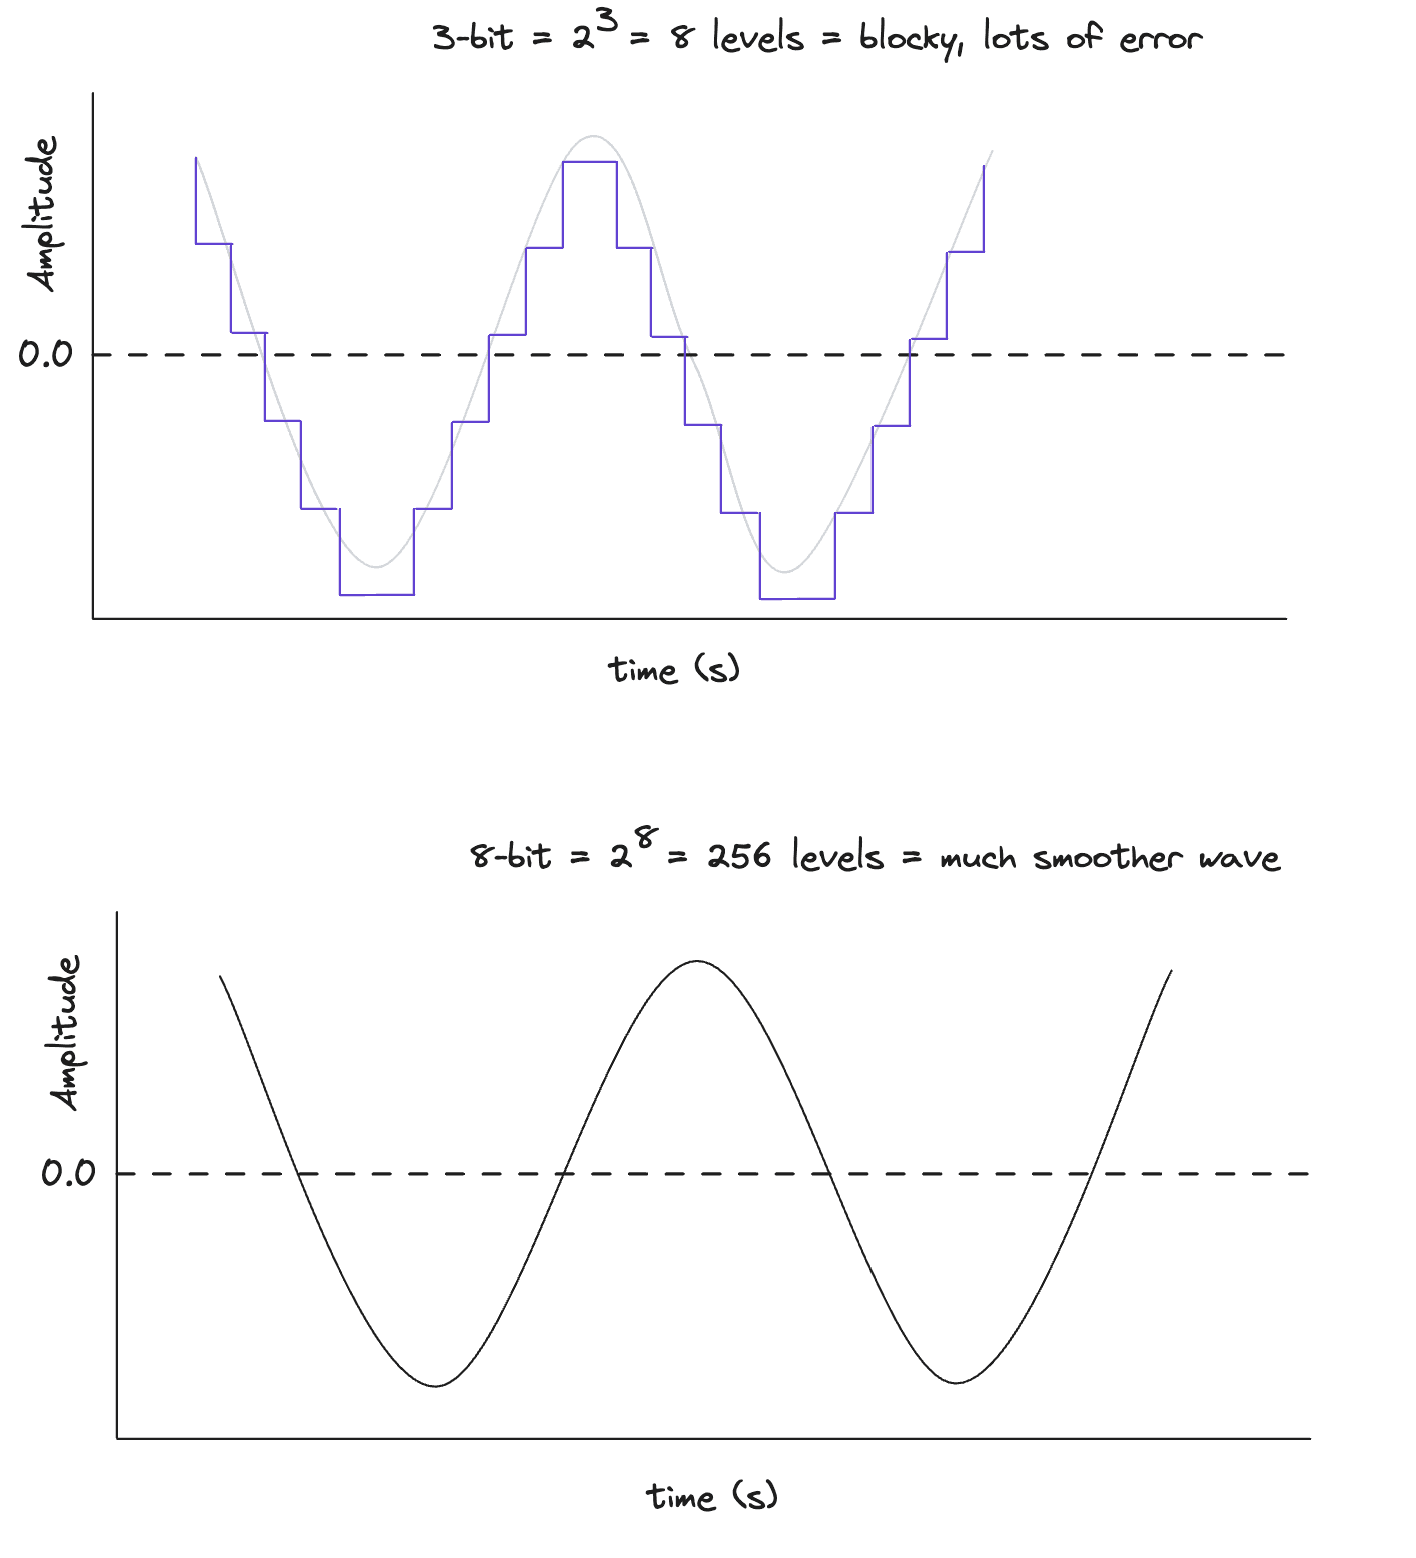
- Bit Depth: Defines the precision of each sample by defining the number of bits used to represent its amplitude. For example, a 16-bit depth, means each sample is a 16-bit integer which allows for (or 65,536) possible amplitude values. A higher bit depth provides a greater dynamic range which is the difference between the quietest and loudest possible sounds—and a better signal-to-noise ratio.
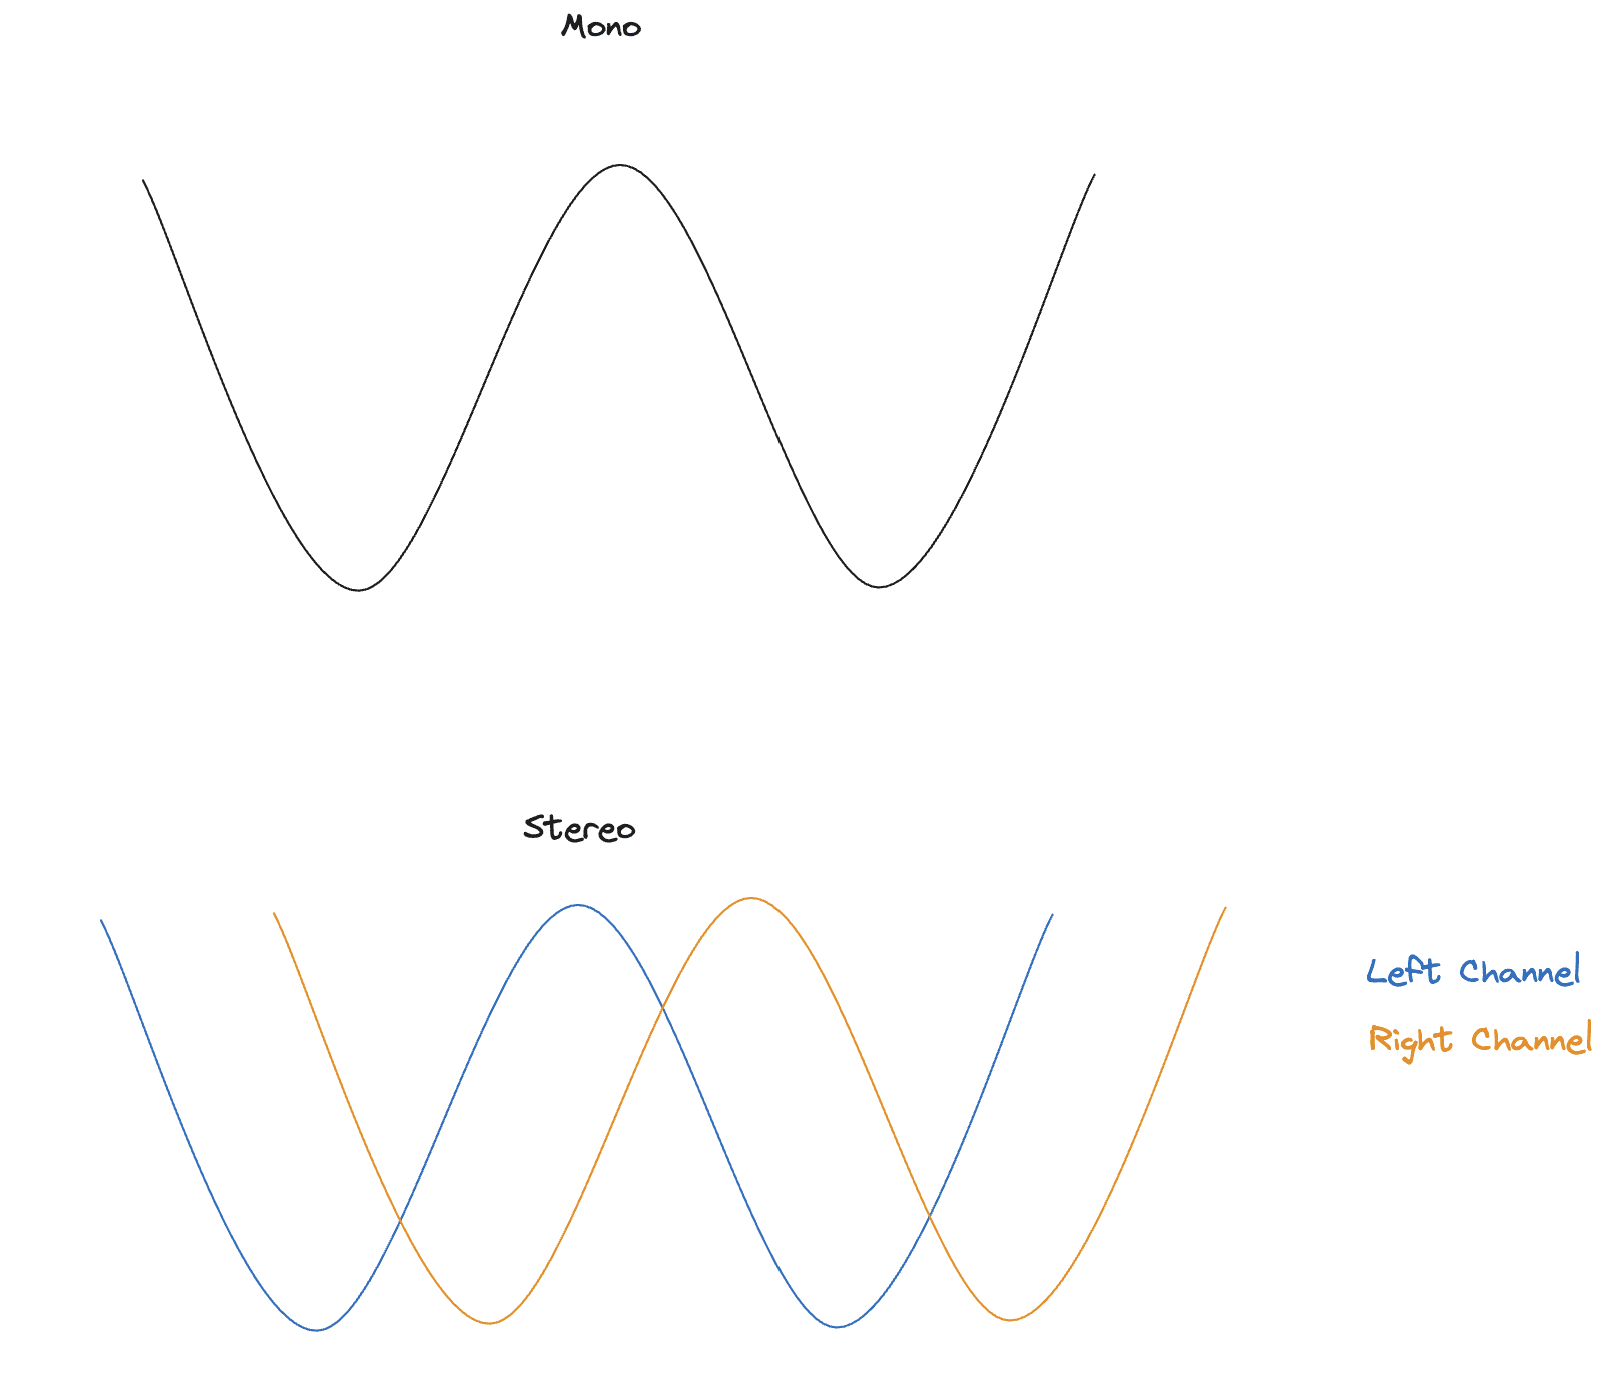
- Channels: This defines the number of audio streams. For mono, there is one channel. For stereo, there are two (left and right). In a byte array for stereo audio, the samples are typically interleaved, meaning a sample for the left channel is followed by a sample for the right channel, and so on.
So, for a 16-bit, stereo, 44.1 kHz PCM stream, our byte array is a sequence where every four bytes is one "frame" of audio, captured every 1/44,100th of a second. The first two bytes are parsed as a 16-bit signed integer for the left speaker's amplitude, and the next two bytes are for the right speaker.
Digital to Analog
So at this point, we have a discrete byte array that represents some audio that is stored as raw bits. How do we convert this to a continuous analog signal that a speaker can play?
That's the job of the Digital-to-Analog Converter (DAC). The DAC is a piece of specialized hardware, usually on your motherboard, sound card or phone, that transforms the discrete digital signal to a continuous electrical voltage that we can send to a speaker.
Let's walk through it step by step.
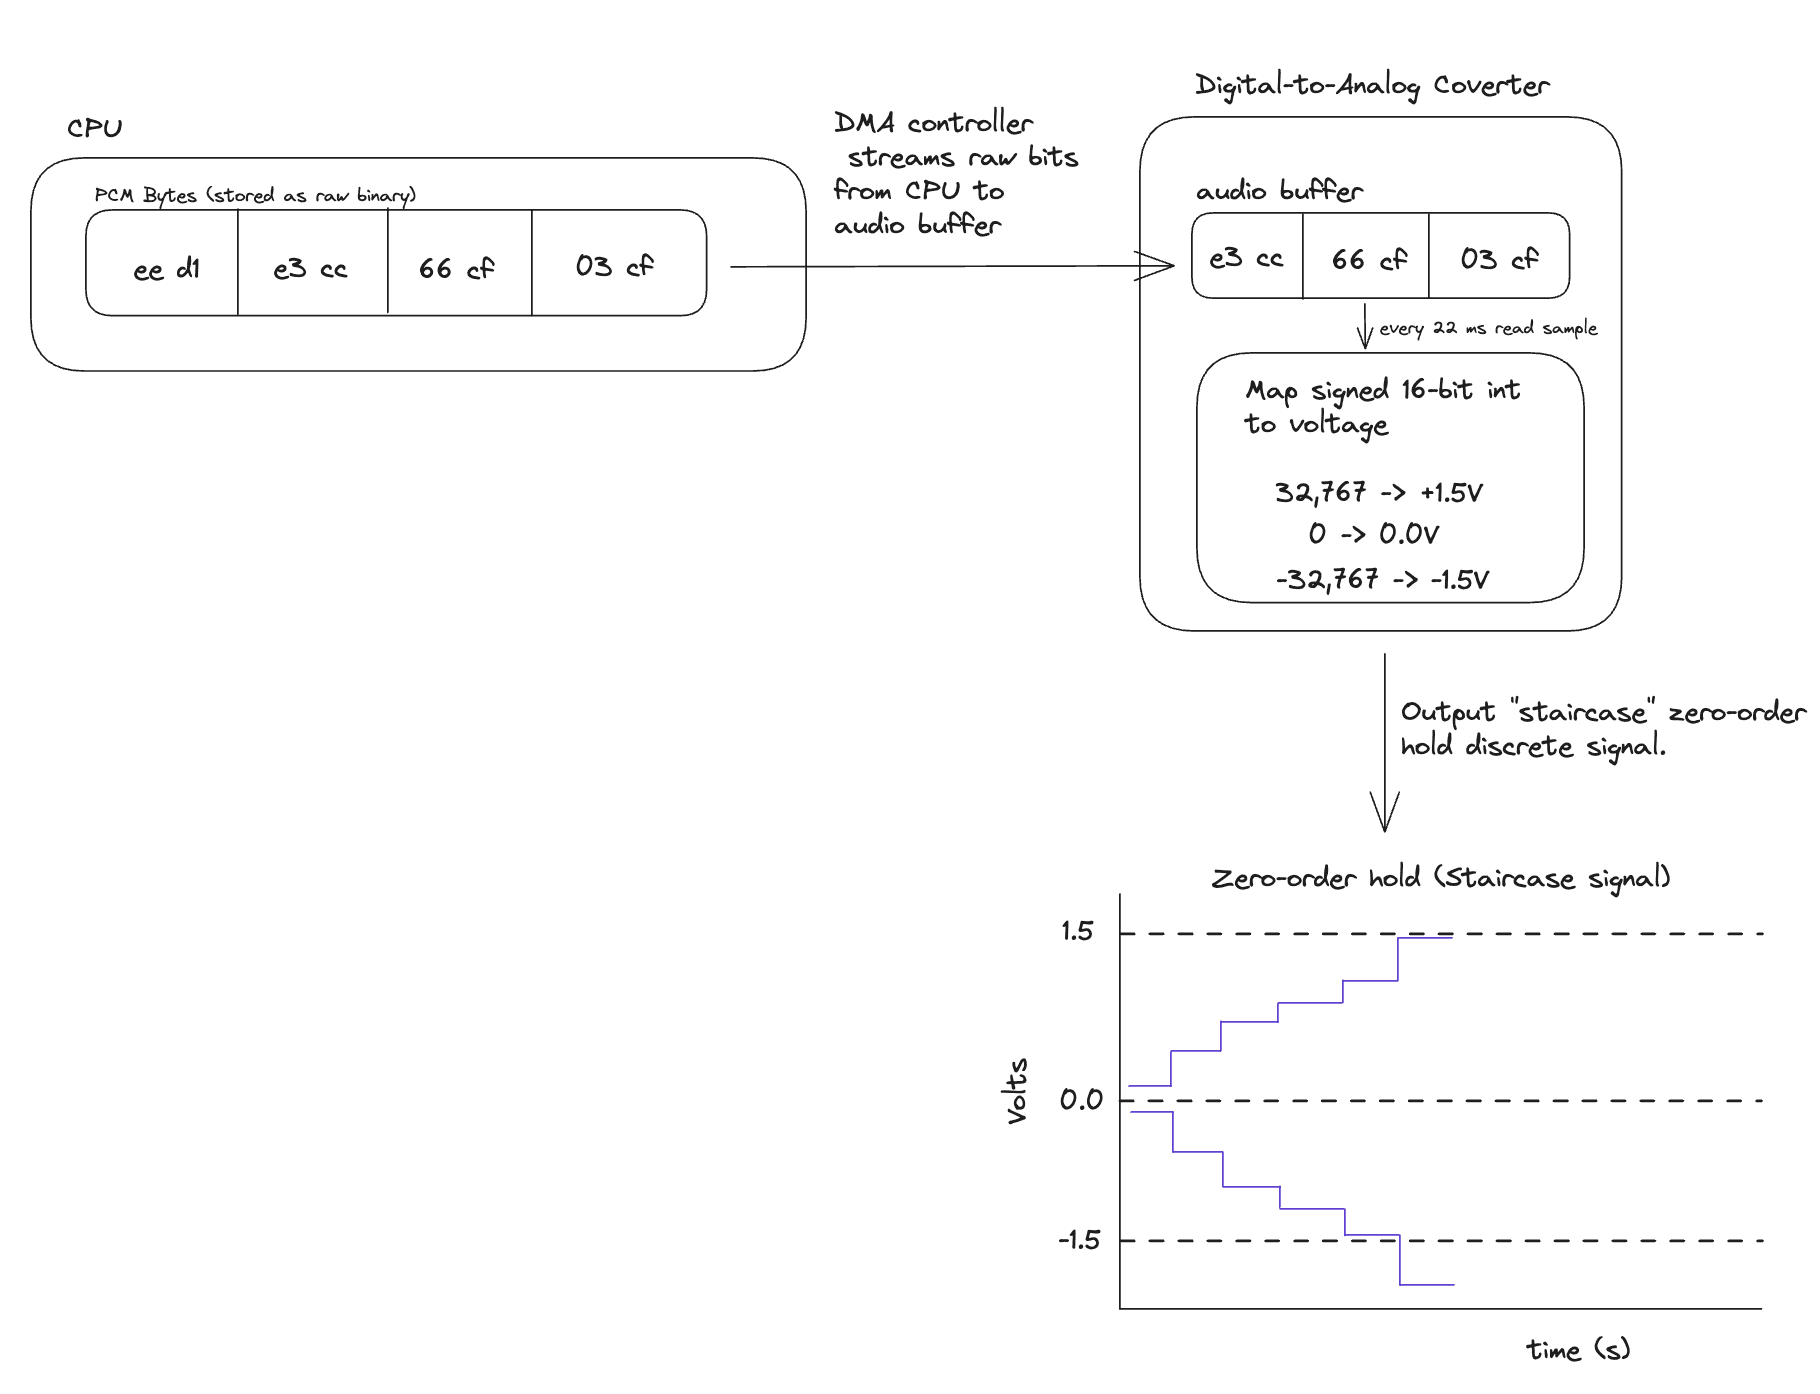
- The CPU streams the raw binary PCM data to the audio controller's buffer. I've put the hex byte values in the diagram to make it easier to understand but they're streamed as raw bits.
- At a precise interval dictated by the sample rate (e.g., every 22.68 microseconds for 44.1 kHz), the DAC reads the next numerical sample from the buffer.
- The DAC generates an analog voltage directly proportional to the integer value of the sample. For example, a value of 32,767 might correspond to +1.5V, a value of -32,768 might be -1.5V, and a value of 0 would be 0V.
The DAC outputs a "staircase" signal known as a zero-order hold signal. The voltage for each sample is held constant until the next sample is processed, which creates a series of discrete steps.
So we've translated our discrete digital signal to a discrete electrical signal.
Next we turn it into a continuous signal.
Smoothing the Edges
In the last step, our DAC created a discrete analog signal that was an approximation of the continuous wave taht we want to output but it had a lot of abrupt transitions (the steps in the stairs). Even at 16 bit depth, it's still jagged and will produce unwated high-frequency noise. We need to smooth it out to create a continuous signal.
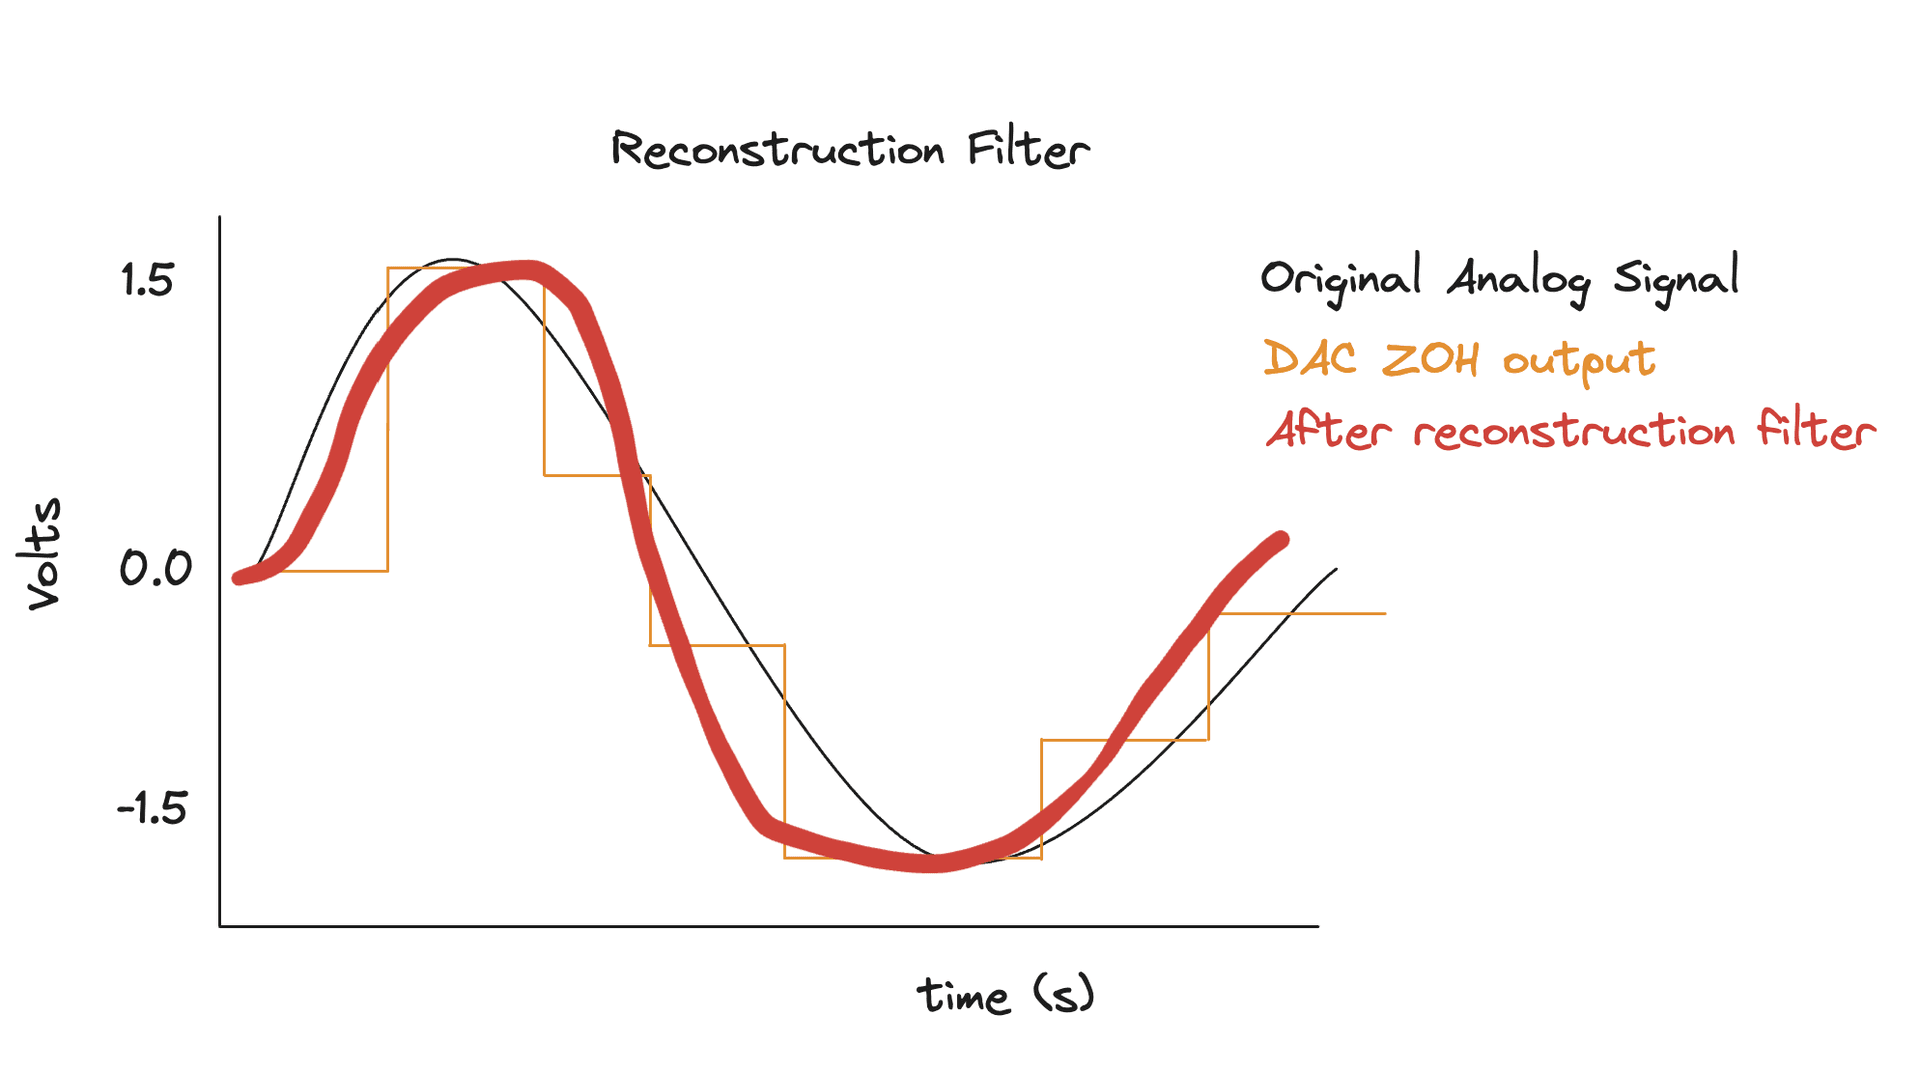
This is where the reconstruction filter comes into play. This filter is a very sharp analog low-pass filter. It removes all frequencies above the Nyquist frequency (). By cutting off these high frequencies, the filter effectively averages out the sharp steps, revealing the underlying smooth analog wave that was originally sampled. The output is a continuous electrical signal that is now (closely, but not perfectly) represents the original sound.
Make It Loud
The analog signal that emerges from the reconstruction filter is a "line-level" signal. It's too weak (low voltage and current) to physically move the components of a speaker. This is where the amplifier comes in.
The amplifier takes the low-power audio signal as input and uses an external power source to produce a high-power copy of that signal as output. The degree to which it increases the signal's power is called the gain, which is what you control with your volume knob. You can think of it like this:
- = the original input signal (low voltage, low current)
- = gain (e.g., 10×, 100×)
- = scaled-up version of the signal
You can see that this is pretty simple scalar multiplication with the scalar being the gain. Under the hood, the amp takes in the weak input signal and then uses the external power source to "amplify" it, without changing the shape, by increasing the amplitude of the input signal proportionally. Small input changes cause proportional output changes
From Electricity to Air
We almost have sound. The final step is to convert the amplified electrical energy into mechanical energy, the physical vibrations of sounds waves. This is the job of a transducer, or the speaker driver.
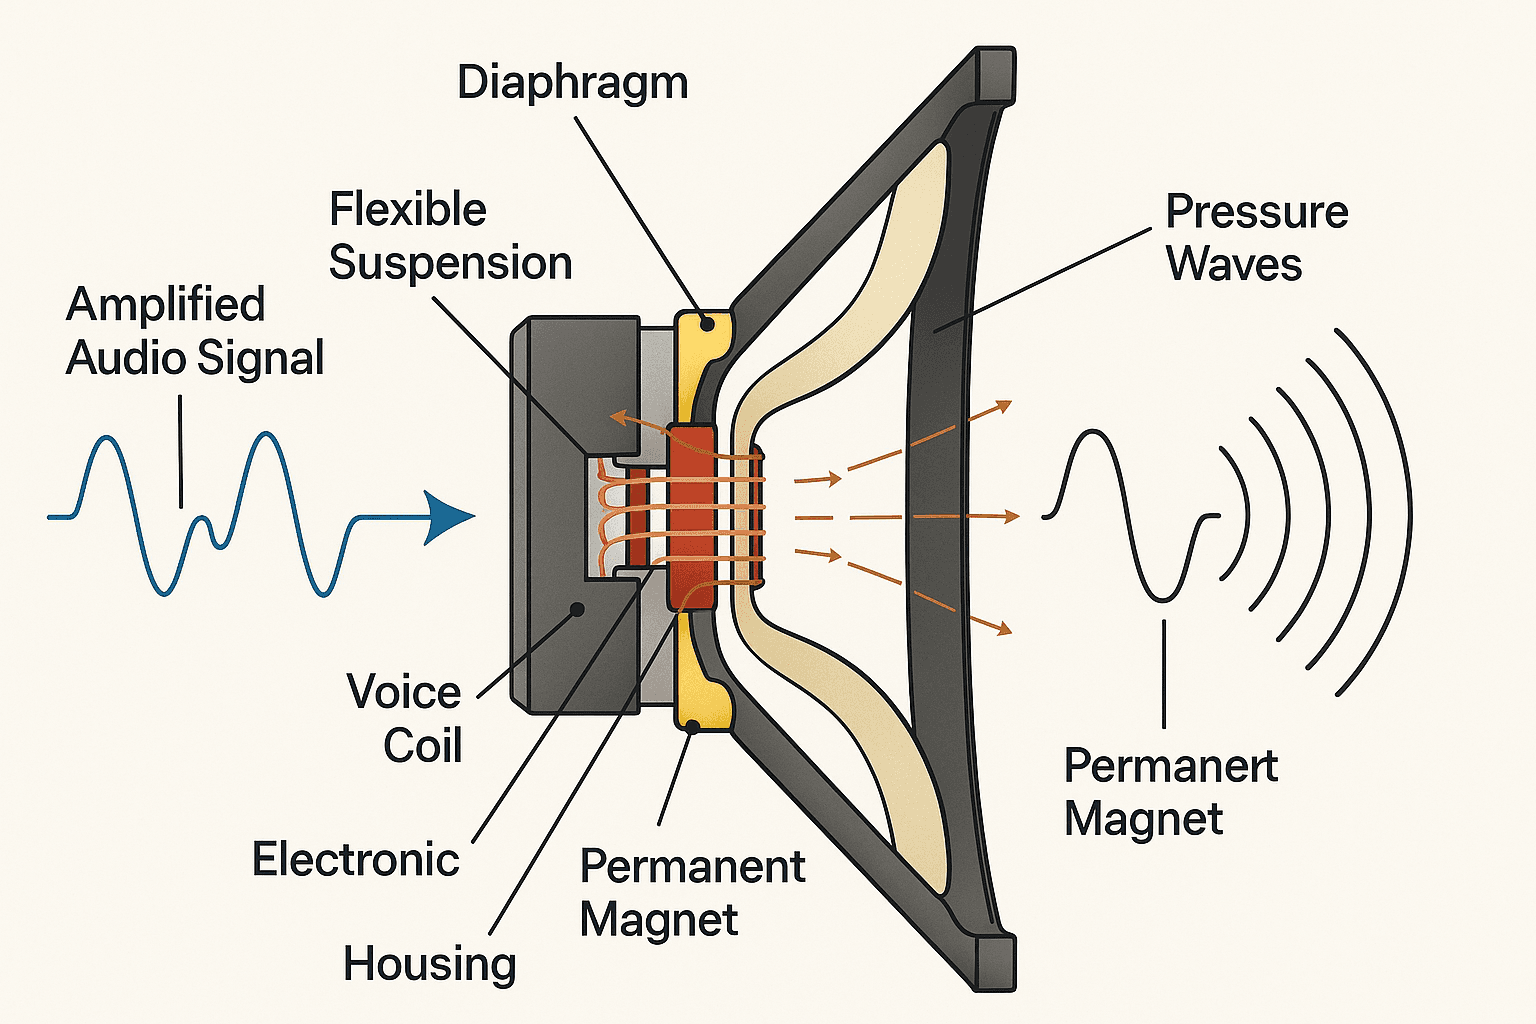
(I pushed my excalidraw skills to the limit so I found this on the internet)
Here’s how it works:
- The amplified audio signal is sent to a voice coil attached to the back of a flexible cone or diaphragm.
- The voice coil is suspended within the magnetic field of a strong permanent magnet.
- According to the Lorentz force principle, when the alternating current of the audio signal flows through the coil, it generates its own fluctuating magnetic field.
- The interaction between the coil's magnetic field and the permanent magnet's field creates a force that pushes and pulls the coil—and the attached cone—back and forth.
- This movement precisely follows the waveform of the electrical signal. The cone's vibration pushes and pulls on the surrounding air molecules, creating compressions and rarefactions.
These propagating pressure waves are what we perceive as sound.
And there we have it. That's how our computers take bytes, the digital representations of sound, and convert them to electrical signals that physically move the internal components of a speaker to create sound.
Hopefully next you play a terrible song, you'll remember how much work your computer and speakers have to do to play your music and you'll play something worth playing.